
How to FURTHER Continue Releasing the Head, Neck, and Back
Not the only way, but A way...

Allow the Neck to be Free,
so that the Head may balance Forward and Up,
so that the Back may Lengthen and Widen,
so that the Knees may go Forward and Away from the Torso,
so that the Shoulders may open apart from the Back,
so that the Arms have a slight Pull at the Elbow…
In this article, we will be talking MOREEEE about allowing the back to lengthen and widen. The directions I have written above leave out the hands and feet so please don’t walk around thinking that they don’t exist! If you have them, they DO exist!1
Remember How We Start
Before I pick up where we left off last week, I am going to STOP and give you the most important reminder I can possibly give you; the Alexander Technique ALWAYS starts at the beginning. By this I mean you cannot say to yourself, “Yeah, yeah, ask for quiet I know. I already know about stopping and the head and neck. It’s time for me to get to my hips and shoulders!”.
This type of thinking is extremely tempting - especially in the face of discomfort or pain - but it will betray you and take you into the dreaded game of tension whack-a-mole! You do not need to be absolutely perfect at any or every step of the Alexander Technique, but you do want to make an authentic attempt to acknowledge the steps of the process in some type of loose order.
I’m stressing this to you because the times when a teacher has skipped steps with me in a lesson (assuming that I know what I’m doing and am oh so smart2….) are the times when I have felt confused and stiff as a board after the lesson. So without being perfect, let’s remind ourselves of some of the basic ideas…
We wish to have an upright sense of poise.
We do NOT want to lock any of our joints.
We want to allow our thoughts to flow at a deathly slow tempo.
The weight of the head is a huge factor in our balance.
There is no need to hold the breath of sigh habitually.
We wish to allow ourselves to have a slight sense of our whole structure (bones/muscles/guts/inner space).
These 6 (which I’ve just listed off the cuff) are all encapsulated in the thought: [“Calm“, “Middle“, “Mushy“] and the Margaret Goldie/Ted McNamara-ism:
Open the Ancient Gateway.
No pulling. No pushing.
All of this lengthy text above is used to encapsulate the sensation I hope you get when you play the opt in/out game from last week. I believe that playing the 4 versions of the elevator game and last week’s opt in/out game are TERRIFIC ways to build an idea of what these words all mean.
Further Releasing the Head, Neck, and Back
Now that you’ve had your meat and potatoes, let’s pick up where we left off last week!
If you recall, I asked you to allow yourself to have an overall sensation of thawing/glacial melt. You should remember that you have a helicopter pilot near the temples and that they are steering your weight. Without concentrating on these thoughts (let them be sensations that you permit), you can let your imagine Zone 1 thawing/releasing tension.
Ideally, this all happens without the head ker-plopping to the ground (dead weight/collapse ) or ram-rodding up towards the ceiling (stiff weight/bracing).
From there, you are invited to think of Zone 2. This region should also be neither braced nor collapsed.
While a good teacher is always the best way to get a sense of these things, you can always DO THE WRONG THING and purposefully brace Zone 1/2. I suggest bracing because I think that’s the easiest thing for someone to do, but you could always try and think of those zones collapsing. It should feel not great in either extreme.
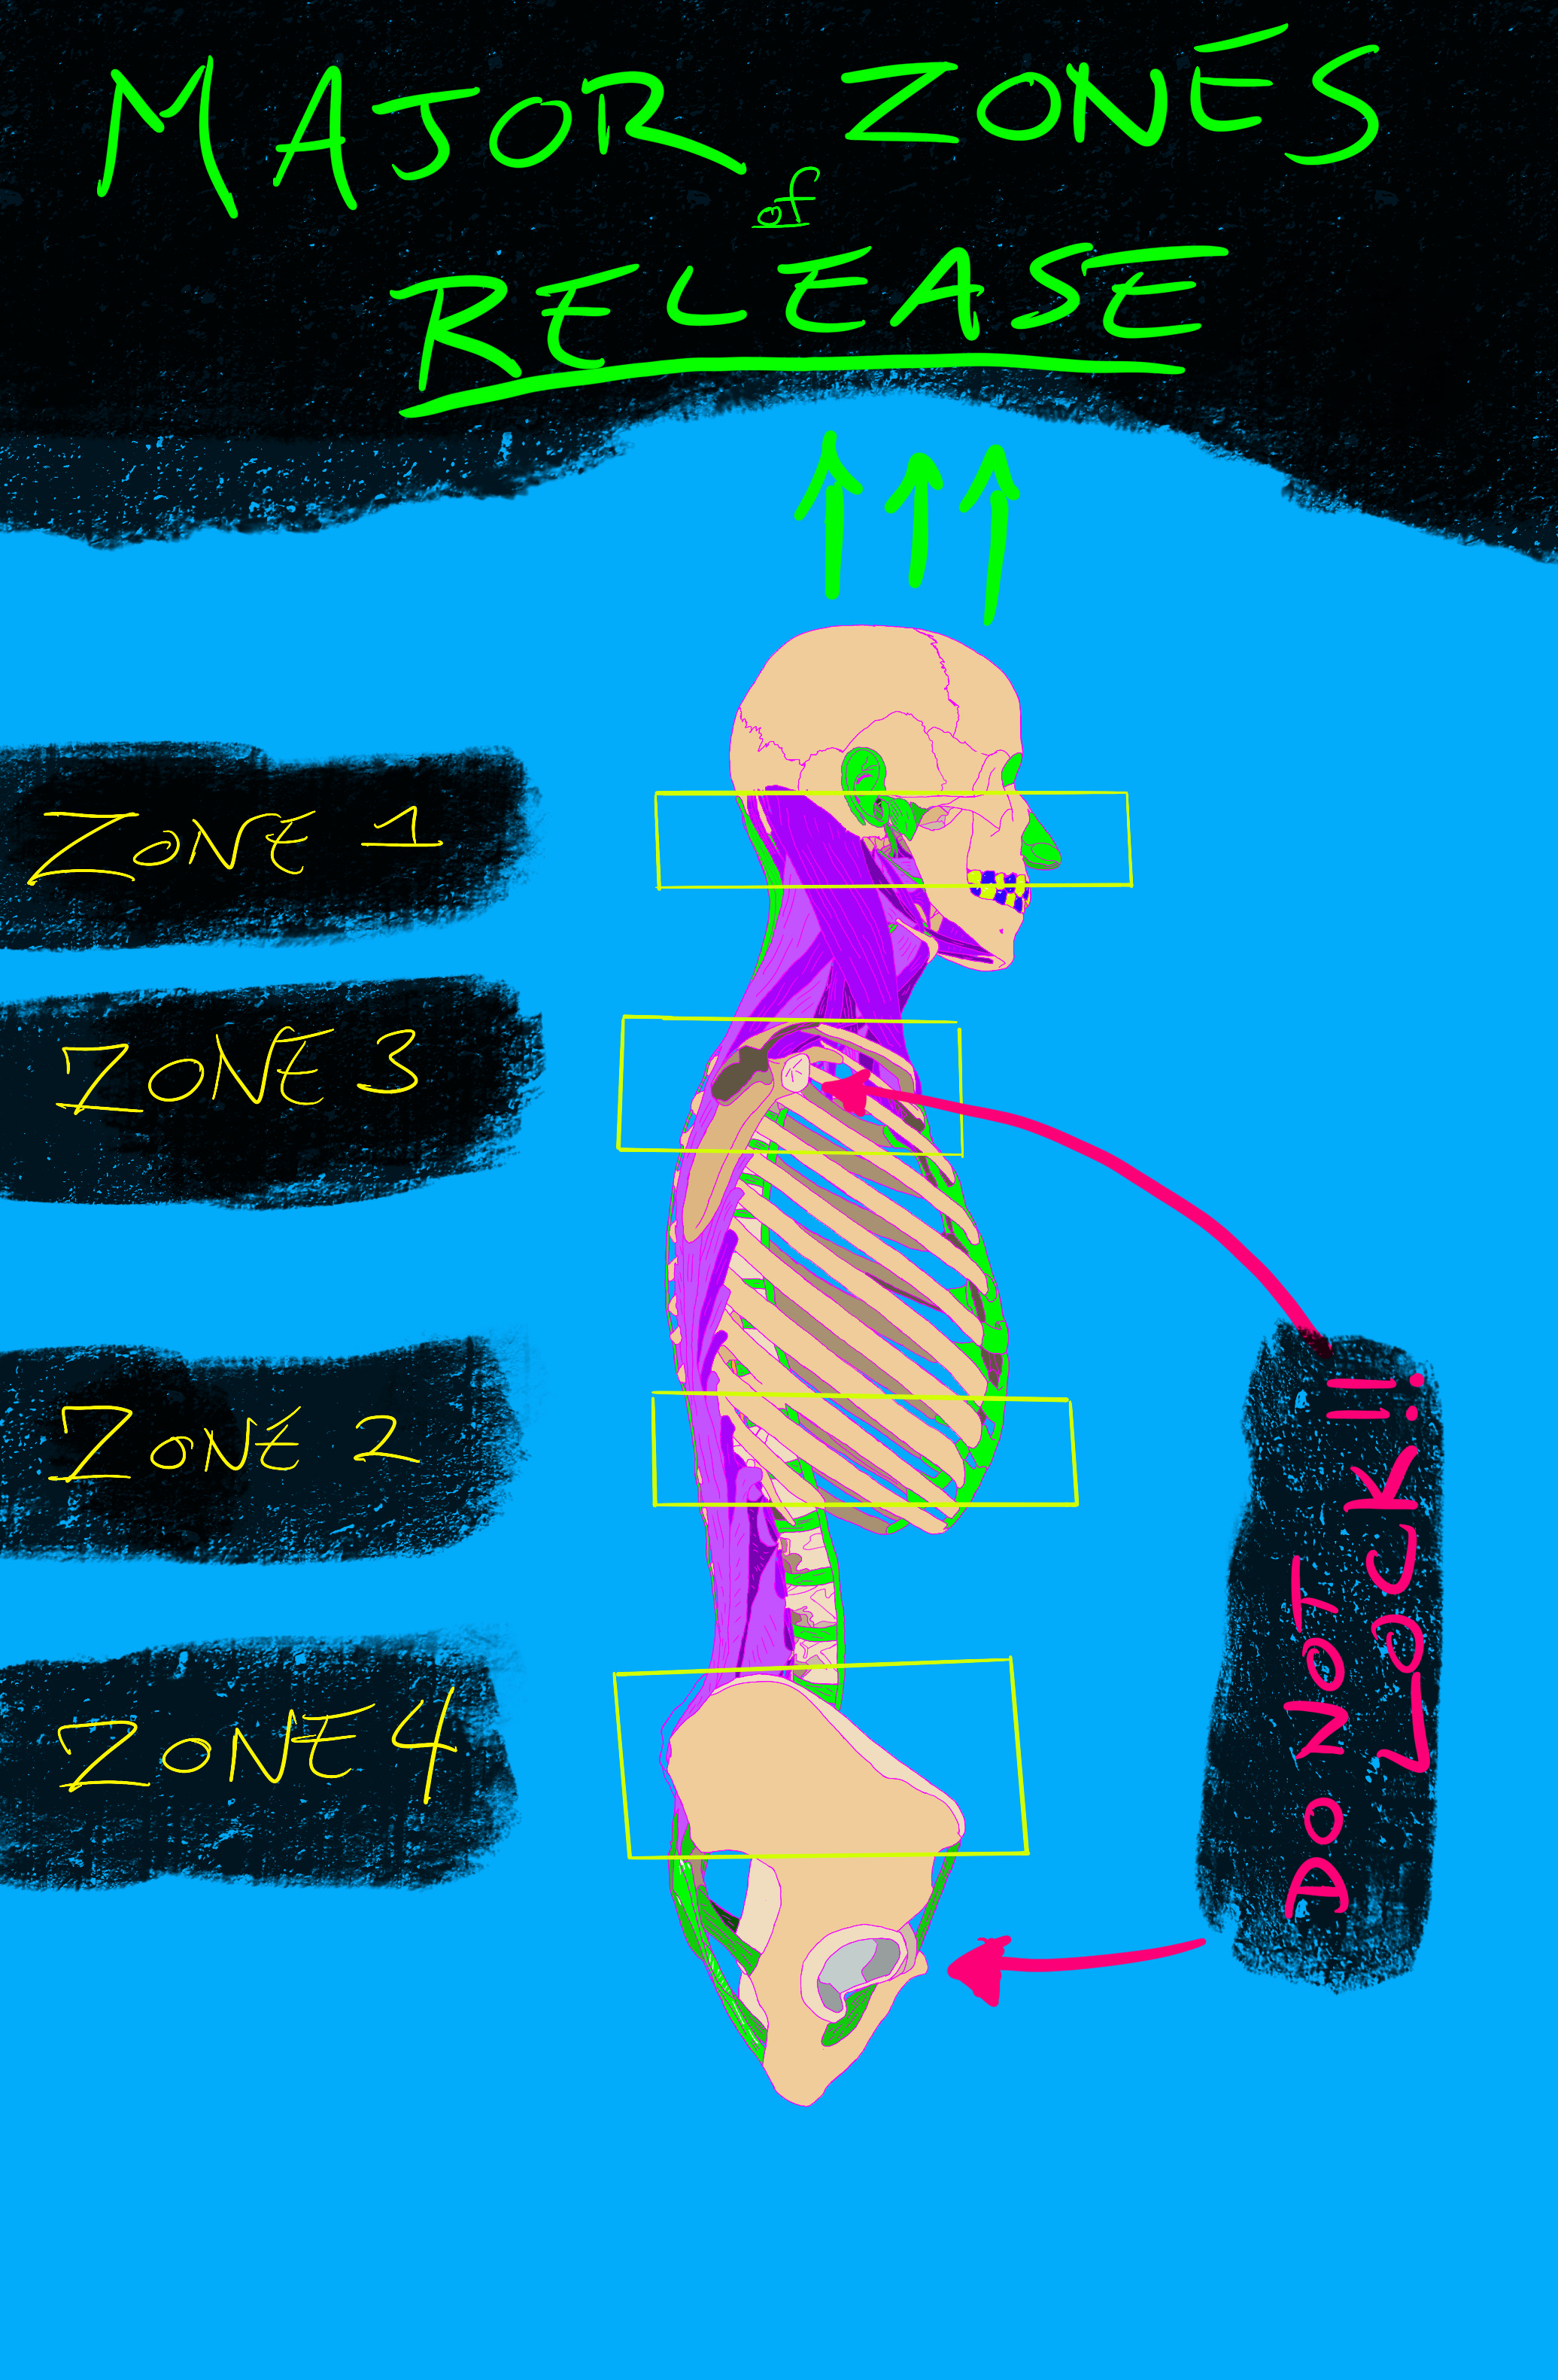
Adding Zone 3
Assuming you’ve made it this far, you may draw your attention to Zone 3. In my helicopter balance analogy, the head is a helicopter, the neck is a cable attached to the bottom of the helicopter, and Zone 3 is a cargo crate being carried by the helicopter.
Zone 3 is a big source of balance information. For most of us feeling heavy in Zone 3, we have gone into a bit of a slump in the upper back after years of doom-scrolling on the phone (or just plain old fashioned rushing through life). As you thaw Zone 3, notice that there is empty space for the air tube and the food tube in that cavity. You absolutely want the area around the spine to thaw, but you ALSO want every fiber around that empty space easing up too.

You’ll notice that I have 2 red arrows in Fig 1. If the 4 sockets for the arms and legs are locked, neither Zone 3 or 4 will have a chance of releasing.
Zone 3 is a damn tricky zone. It loooves to get stiff and haaaates waking up for most of us. Be patient here. Zone 3 has a bunch of muscles and bones interwoven throughout. When this structural complexity bumps heads with our desire to RUSH, things can get tricky.
In my personal case, Zone 3 is where I locked joint/pinched nerve from injury. The pinch occured at the right side of the spinal column and gave me the feeling that my midline ran smack through the pinch point. I’ll probably write about this more in detail in another blog post, but to make a long story short the pain in my spinal column distracted me from my sense of [“Middle“]. I found it helpful - for a time - to sense the inner space of the air tube/food tube. This sense of quiet space eventually helped me feel the actual midline of the spine and significantly thawed out Zone 3.
Adding Zone 4
After you’ve had some thought of Zone 3 thawing, you should allow a sense of Zone 4 to come to your attention. When it comes to Zone 4 - the base of the spine between the pelvis and juuuust above - I thought about including the hip sockets where the leg bones attach to the torso. For damn near arbitrary reasons I have kept them out of Zone 4 in my drawing.
In a private lesson, I will place hands on the sides of the hips where the legs attach and ask the legs to not lock. In order for Zone 4 to thaw, you must have some marginal sense that all of the legs are [“Calm“, “Mushy“]. This helps the lower back come out of a lock.
Between Zone 1, 2, 3, and 4
You’ll notice that there are parts of the back that are NOT highlighted. These areas are important. Every area is. But the 4 zones that I’ve highlighted are the major areas of mobility and most likely to suffer from injury. These zones unlocking tend to help all of the other bits and bobs in the torso open up.
I think you’ll have the most success with today’s article in a lie down. If you feel stuck with any of this, remind yourself that John Dalto wrote an incomplete article! The only expectation that I have for you is to be able to lie quietly and allow your sense to stay general and quietly give yourself the thought of additionally thawing through the zones.3
Altogether.
And one after the other.
Get In Touch
If you’re in NYC, you may learn more about my private teaching practice at johndalto.com.
If you’d like to book any lesson time with me, you can find my booking link here.
If you have any severe injuries, you can STILL do the Alexander Technique. An attitude of [“Calm“, ”Mushy”, ”Middle”] is the main event!
FOOLED THEM!!! ME MAKE MISTAKSE TO!!!!!
Hopefully, you won’t feel like your sense of feeling is ping-ponging about the place. It should seem quite quiet.
Just brilliant. Yay thinking and doing this releases my body for me and, in turn my mind.